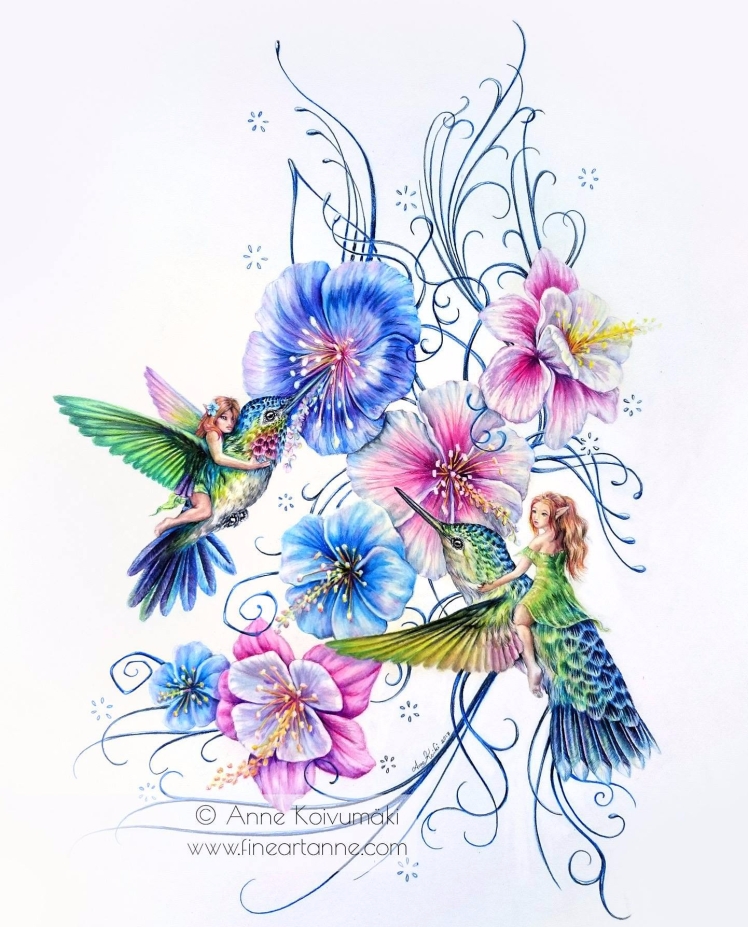
I was asked to do this kind of tutorial, where you guys can color the same picture as I do and I try to explain some methods I use when doing colored pencil pieces. I will color this Pixies and Hummingbird picture Live at my YouTube channel.
You can purchase that picture from my sellfy.com/fineartanne account.
So, how did I start my piece? Firstly I want to emphasis the importance of right kind of paper. Because this is going to be a colored pencil piece, the paper you are using should not be to rough, especially when doing as detailed picture as this. I like to use hot pressed watercolor papers. The one that I’m using is Schut 300 g, hot pressed watercolor paper that is 100% cotton. And because I use that paper, I can’t print the picture directly on that paper. That is one reason why I trace that printed picture on my paper, and another reason for that is because I personally don’t like coloring those pictures that have outlines. But you can do as you want, you can either print that picture to the paper you are using or you can do as I did and trace it. And now I show you really easy way to do that.
Step 1. Print the picture to another piece of paper. I recommend to print this at least to size of A3 or bigger because there are areas like on those Pixies faces that are really hard to color because they get so small.
Step 2. Use your colored pencil and color the backside of your print paper. I like to use Faber-Castell Polychromos pencils for that coloring. I also like to vary the color I use depending on the area. For example here, I used red color on flowers I want to be red, and blue on the ares that I want to be blue. The wings of those hummingbirds are going to be green and to pixies I used more brownish color.
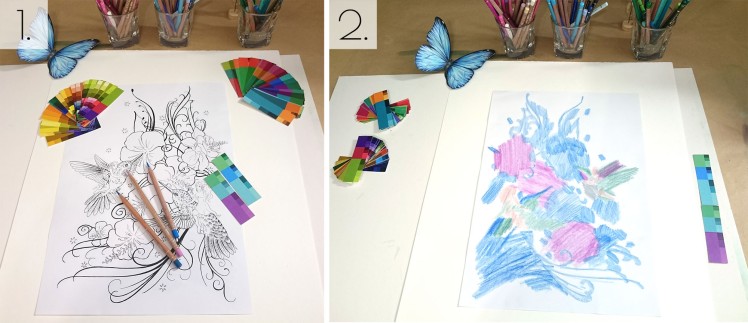
Step 1. Print the picture and select a paper you want to draw it in
Step 2. Use colored pencil or pastels to add color on the backside of your printed picture
Step 3. Put your print picture on top of the paper you want to use and tape it on place so that it wont move when you start tracing. I like to use this removable Scotch tape. You recognize that from that light blue center area. That tape does not tier your paper and can be really easily removed. I use that when I tape these tracing papers on my paper or if I want to protect some are from getting color for example on pastel paintings, but that tape can’t be used for more heavy use because it does not stick that hard on anything.
Step 4. Use some pen for tracing the lines. I like to use ballpoint pen because that moves so easily on my paper and also I can see where I have already colored. Make sure you check out you are getting the color on your paper but also don’t push too hard. You don’t want to damage your paper.
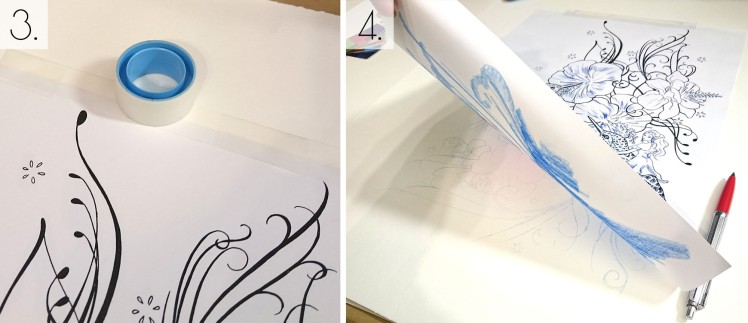
Step 3. tape the picture on place
Step 4. use ballpoint pen to trace the image to your paper
After you have traced you picture to your paper, sharpen those areas that have not got enough color or are lacking details.
Pencils that I will be using in this project are Faber-Castell Polychromos, Caran d’Ache Luminance and Caran d’Ache Pablo pencils. And as mentioned earlier, the paper is Schut 300 g, hot pressed watercolor paper that is 100% cotton.
And now we are ready for coloring. Make sure you have subscribed to my channel so you get the notification when I’m live streaming. Feel free to ask questions and if you do color this Pixies and Hummingbird picture with me, tag me to your picture. I would love to see your beautiful creations!
Coloring together Part 1 – Pixies and Hummingbirds
In this I will color that hummingbird and pixie on the left. Hope you find this useful!
Coloring together Part 2 – Pixies and Hummingbirds
In this video I do that blue flower next to hummingbird. Quick tip! Do a under coloring with white colored pencil, before layering the darker colors on top of it. That will help you to erase areas back to white, like those flower stamen I did here. Without that white under layer I would not be able to erase that are so white.
Coloring together Part 3 – Pixies and Hummingbirds
In this video I continue this piece by coloring those two other flowers and darken up those lines behind and above those flowers. In this video I showed again that white under layering technique that helps you to erase areas back to white and do little white details like those flower stamen. Also we had little discussion about coloring white and black animals and flowers and what colors to use.
Coloring together Part 4 – Pixies and Hummingbirds
In this video I color that other hummingbird and pixie and I also show you how you can use Scotch Magic tape for doing little highlight and details by removing the color and revealing the white paper under that.
Coloring together Part 5 – Pixies and Hummingbirds
This is the last video of this series. In this I’m doing those last little flowers, two blue flowers and one pink flower and also those curly lines.
And last but not least, here is the finished picture. Thank you all for hanging out with me on these live streams and HUGE thanks to all of you who have supported me by buying this coloring page. I really appreciate it!
There is also Prints available from this picture.